Advanced IF
Purpose
With RPA, decisions must often be made based on conditions to add business logic to tasks. In support hereof, the Yarado toolbox offers the Advanced IF function, so you can implement decision-based logic into your automation.
Besides your regular business logic, you can also create “for each” and “do while” loops with the Advanced IF function. These additional loop options can be used independently of the loop that's controlled by the loop file.
Double click the icon or drag it to the process visuliser to use the Advanced IF function.
Using Advanced IF
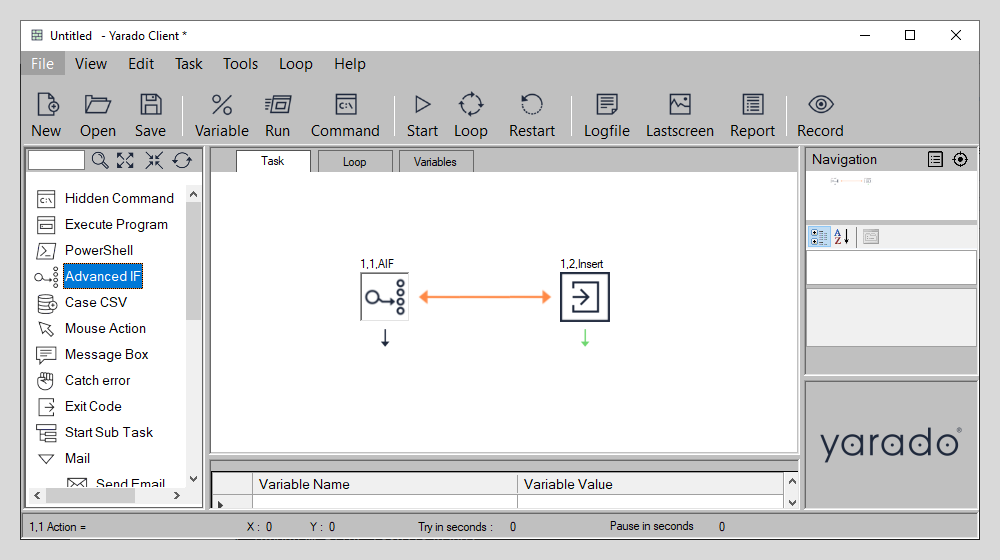
The Advanced IF step is a step that must be created manually because it is not possible to provide the decision criteria when you are in recording mode.
If you select the Advanced IF function from the toolbox, Yarado will automatically create a placeholder right next to the Advanced IF step. After you have set the criteria for your Advanced IF, you need to insert a step into this placeholder before you can continue adding other steps.
Interface elements
| Element | Description |
|---|---|
| 1. IF / IF NOT | Select the trigger condition. |
| 2. Variable Equals/Contains | Yarado will test based on the contents of a variable. |
| 3. Select Variable | Select the corresponding variable. |
| 4. Equals/Contains | When testing, define whether the variable should equal (fully match) or contain (partially match) the value. |
| 5. Case sensitivity | Checking this box will enable case sensitivity, meaning that Yarado will differentiate between UPPER and lowercase characters. |
| 6. Value to match | Select the value or variable to test against. |
| 7. Define next step | If the test condition is met, choose whether Yarado will take the next step down or right. |
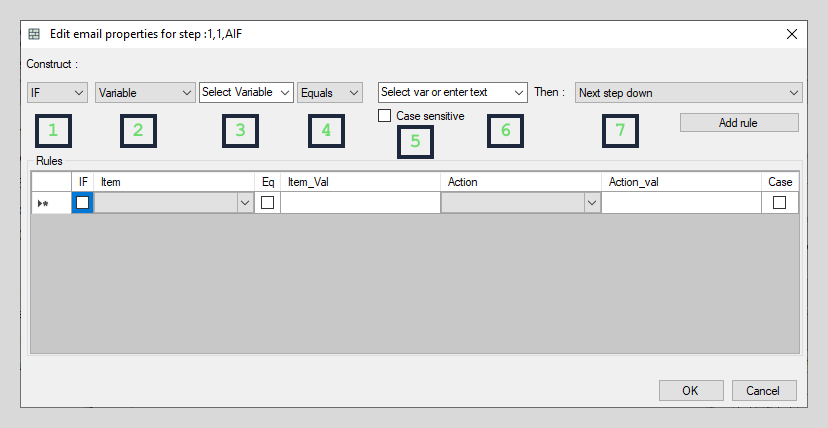
Variable based interface elements of Advanced IF.
You can also have the Advanced IF step test against the contents of the machine's clipboard.
| Element | Description |
|---|---|
| 8. Clipboard Equals/Contains | Yarado will test based on the contents of the machine's clipboard. In this case, selecting a variable is not required. |
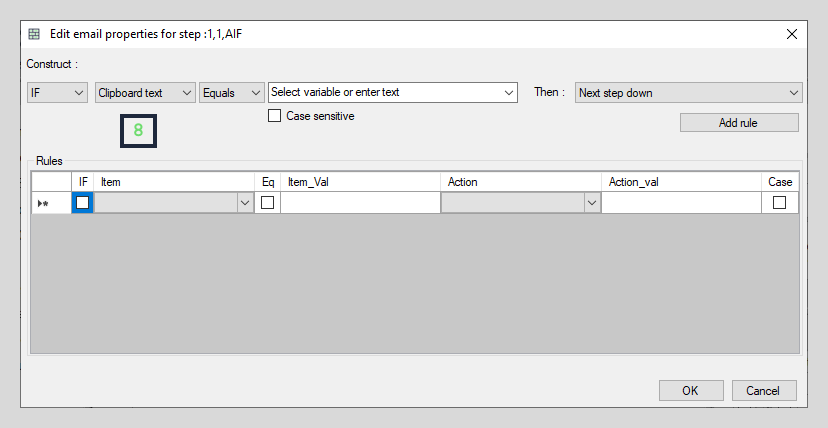
Clipboard based interface elements of Advanced IF.
Yarado variables are available everywhere users can type text, including the file path text box in the Advanced IF function.
| Element | Description |
|---|---|
| 9. File exists | Yarado will test if a specific file exists. |
| 10. Path | Specify the file path of the file Yarado should try to locate. You can use variables as (part of the) file path too. |
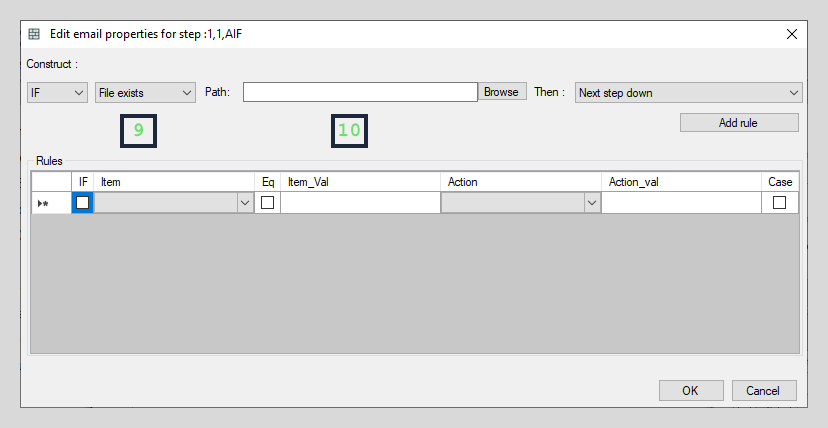
File based interface elements of Advanced IF.
Adding or deleting rules
Once you have configured your rule, click on Add rule to confirm and enter it into the list of rules.
To delete a rule, you first need to select the row you want to delete. You can do so by left-clicking in the most left column of the rules table. If you do so, the row you have selected will light up blue. Then you can right-click to delete the select row or press Delete on your keyboard.
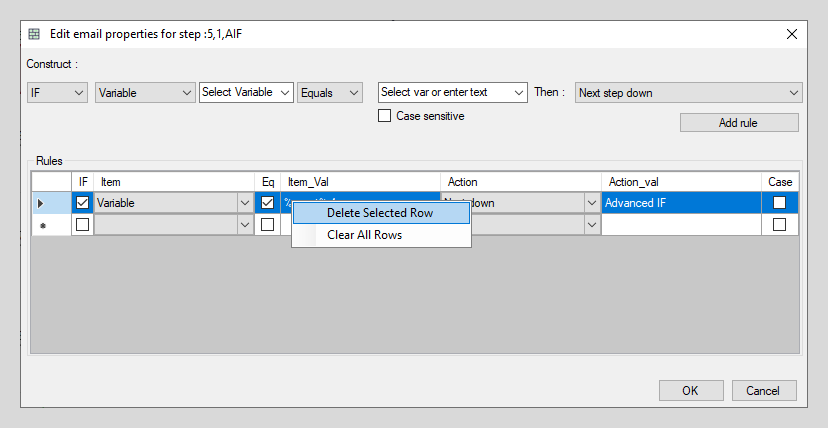
Deleting a rule.
Tip
You can stack multiple rules, reducing the need for multiple Advanced IF
steps. Yarado continues based on the first rule it matches, meaning that
it's, for example, rule 1 OR rule 2.
Example
Creating a "game" with Advanced IFs
TL;DR
Just want to have a look at the task and figure it out yourserlf? Download a copy of this example here (.zip)
By combining the Advanced IF step with a Go-To redirect, you can create a loop that is, for example, controlled by a variable. By doing so, you can have Yarado loop until your predefined condition(s) are met, independently of any .csv based loop file.
For this example, we will use a count variable that is incremented by 1 with each loop.
Tip
When working with Advanced IF/Go-To based loops, it's recommended to reset the value of your counter variable at the start of each task. Otherwise, you have to manually reset the counter variable every time you run your task.
-
Create six variables:
%count%to keep track of the number of loops.%fruit%a fictive object used to trade in the game. Set it toapple.%choice%a variable that records a message box choice.%coins%a variable that set the players starting budget. Set it to500.%price%a variable that determines the price of the fruit. Set it to100.%decision%a variable that records the final message box decision.
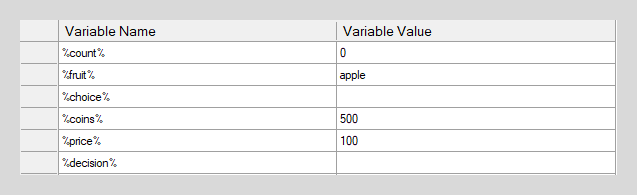
Variables used in this example.
-
Create a new Set Value step by double clicking on Set Value in the toolbox (Toolbox → Functions → Text → Set Value) on the left, or by dragging it to the process visualiser. Configure it with the following settings:
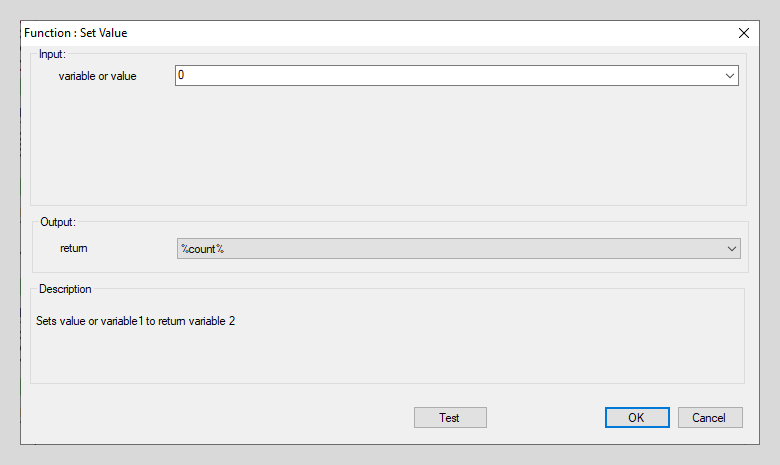
Reset
%count%variable value as the start of the task.Add a second Set Value function as a stacked function by selecting "Text" in the filter category dropdown and and "Set Value" in the select function dropdown. Click "Configure" to continue.

Two stacked Set Value functions
To ensure you start each game with enough coins, also reset this variable to its default value before continuing with the game.

Reset
%coins%variable value as the start of the task.Click on Add rule and OK to save this step.
-
Create a new Message Box step by double clicking on Message Box in the toolbox on the left, or by dragging it to the process visualiser. Configure it with the following content and settings:
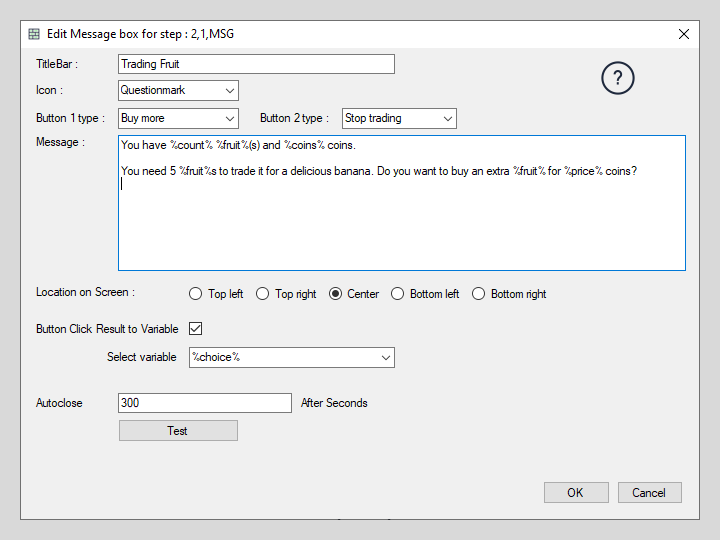
Configuration of the first message box.
You can copy the message box content:
You have %count% %fruit%(s) and %coins% coins.

You need 5 %fruit%s to trade it for a delicious banana.
Do you want to buy an extra %fruit% for %price% coins?
In addition to the message box text, please also set the title, buttons and the result variable according to the example shown in the image above.
Click on OK to save this step.
-
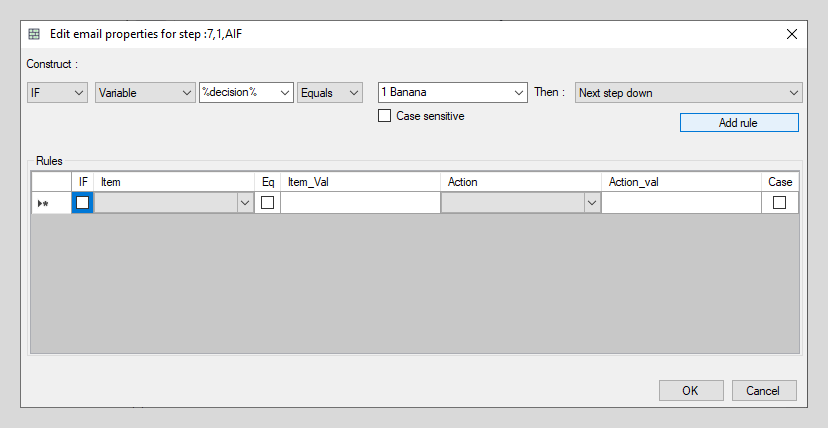
Add your first Advanced IF by double clicking on Advanced IF in the toolbox on the left, or by dragging it to the process visualiser. Configure it with the following settings:
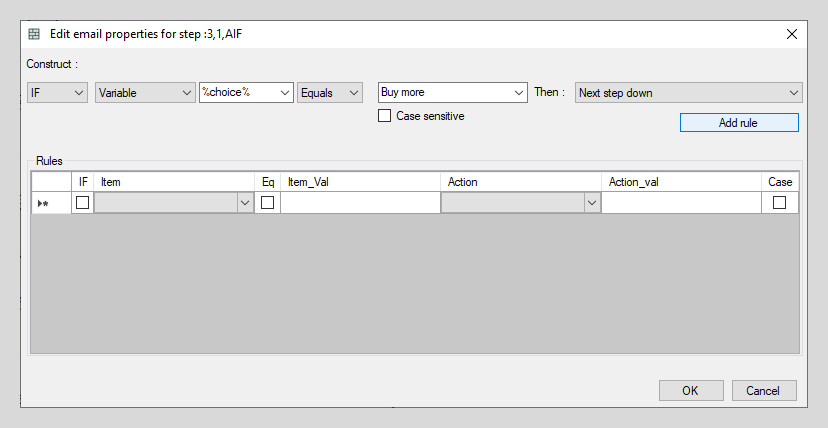
Configuration of the first Advanced IF.
Click on Add rule and OK to save this step.
-
Insert another Message Box into the placeholder that has appeared on the right sight of the Advanced IF step. Configure it with the following content and settings:
Configuration of second message box.
Click on OK to save this step.
-
Add another function, this time an Add/Subtract, located in the Toolbox under Functions → Math → Add/Subtract and configure it with the following settings:
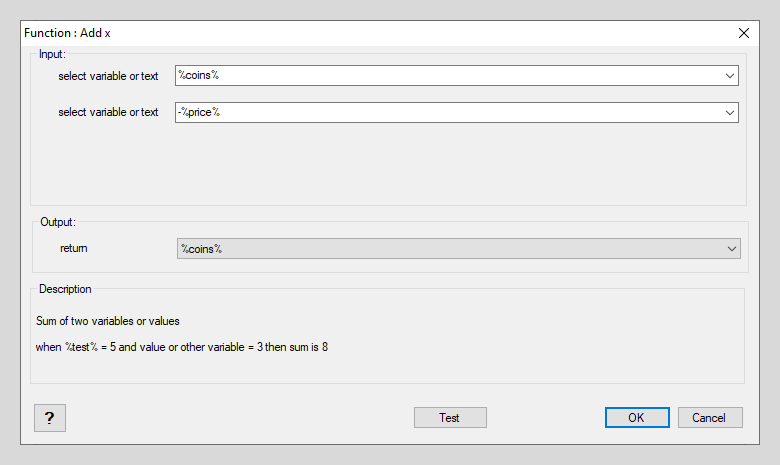
Configuration of the first Add/Subtract to subtract 100 coins.
Click on OK to save this step.
-
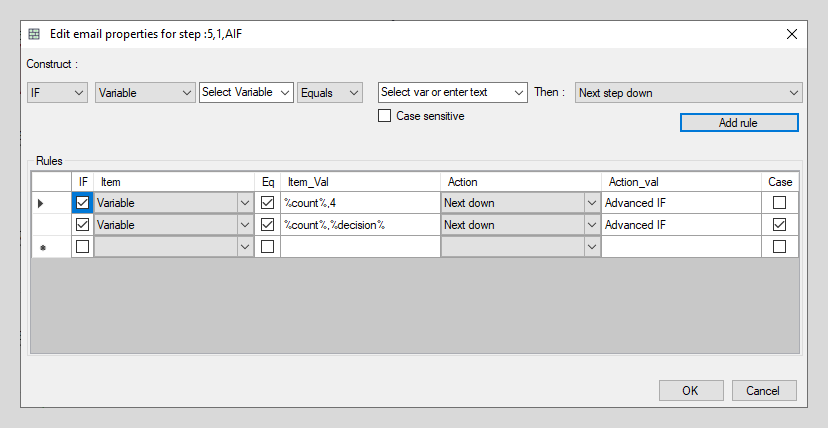
This step introduces the do while loop. Start by adding another Advanced IF step and configure it with the following settings:
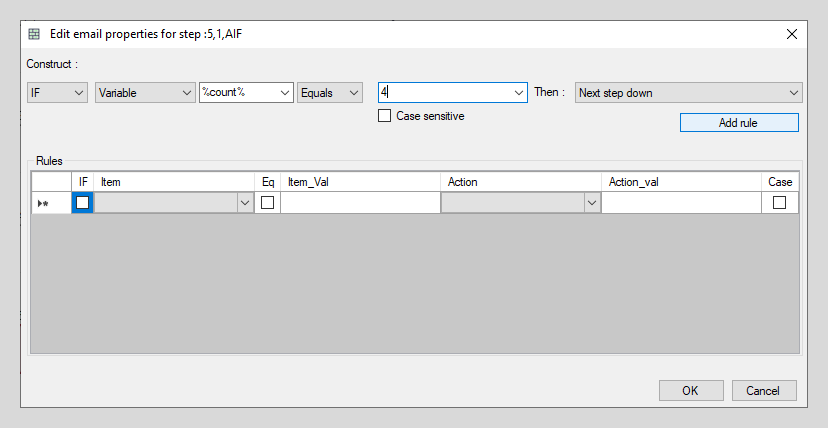
Configuration of the second Advanced IF and do while loop.
Click on Add rule and OK to save this step.
Setting the rule to take the next step down until the
%count%variable equals 4 means that you can configure the step you have to insert on the right of the Advanced IF to increase the%count%variable with 1. Combine that with assigning a Go-To to that step, and you can create a do while loop that keeps on running until you have, in this case, acquired 5 apples. -
Inset another Add/Subtract function into the placeholder and configure it with the following settings:
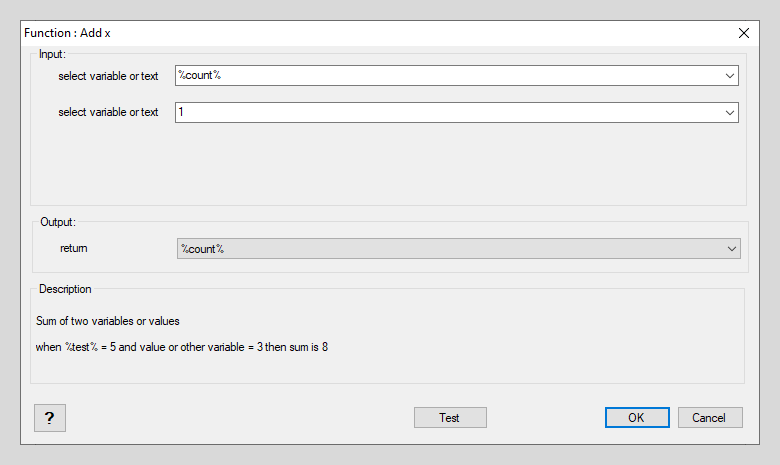
Configuration of the second Add/Subtract to add 1 to the loop count.
Click on OK and OK to save this step.
-
Add the Go-To redirect to complete the do while loop by right-clicking on the function step you have just inserted and clicking on Conditions → Go To.
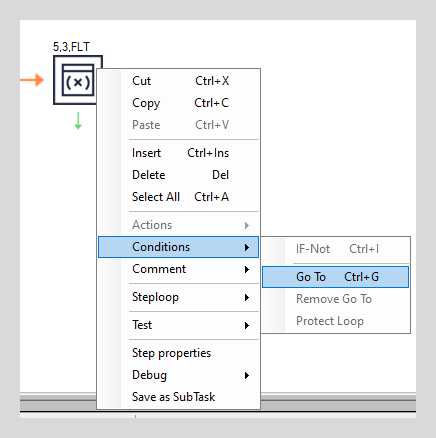
Setting the Go-To to complete the do while loop.
Click on step 2.1 (Message Box) to have this step link back to the first decision message box. Once you have done that, an arrow should appear to indicate the Go-To routing. Your Process Visualiser should now look like this:

Overview of the Process Visualiser.
-
Add another Message Box and configure it with the following content and settings:
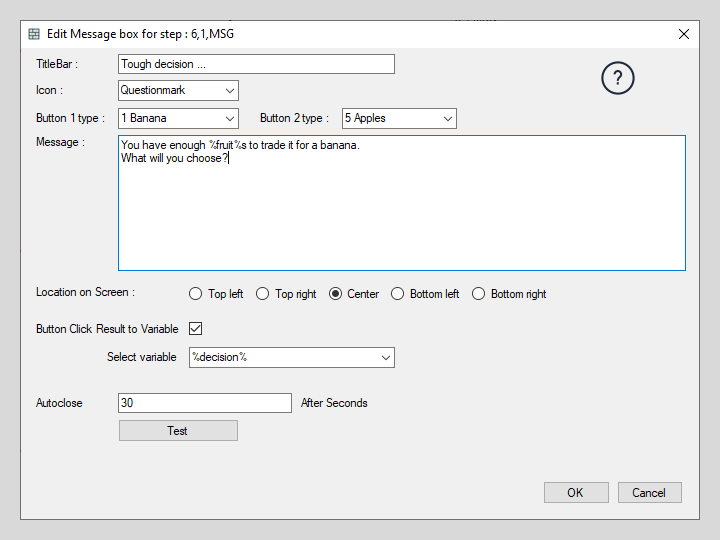
Configuration of the third message box.
You can copy the message box content:
You have enough %fruit%s to trade it for a banana.
What will you choose?
In addition to the message box text, please also set the title, buttons and the result variable according to the example shown in the image above.
Click on OK to save this step.
-
Implement the final decision by adding another Advanced IF step and configure it with the following settings:
Configuration of the second Advanced IF and do while loop.
Click on Add rule and OK to save this step.
-
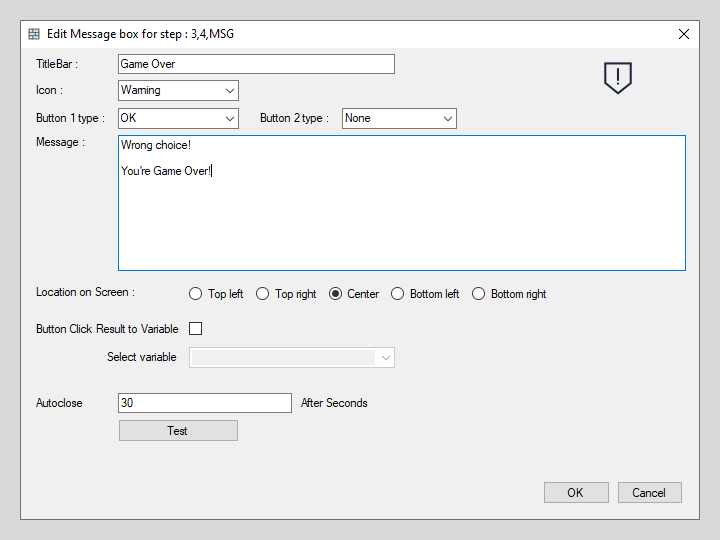
Inset another Message Box into the placeholder on the right and configure it with the following content and settings:
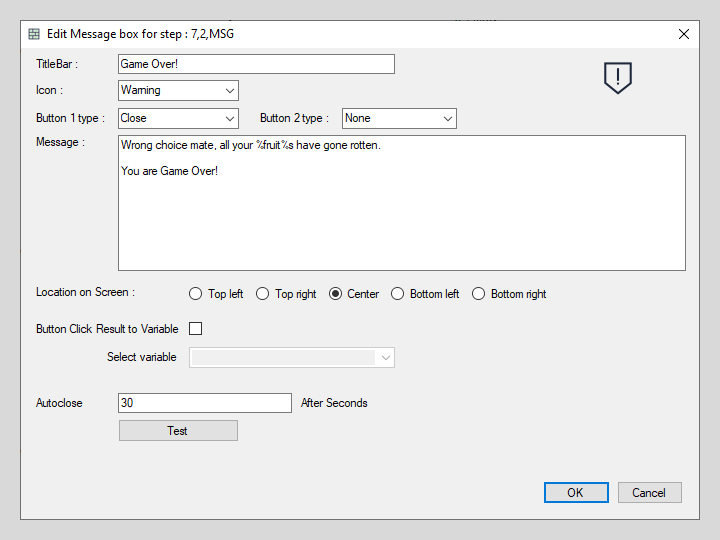
Configuration of the fourth message box.
You can copy the message box content:
Wrong choice mate, all your %fruit%s have gone rotten.
You are Game Over!
In addition to the message box text, please also set the title, buttons and the result variable according to the example shown in the image above.
Click on OK to save this step.
-
Inset the final Message Box below and configure it with the following content and settings:
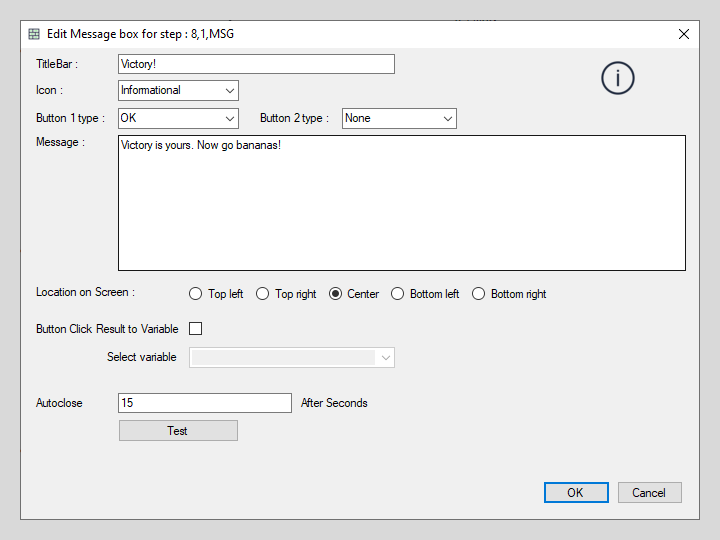
Configuration of the finale message box.
You can copy the message box content:
Victory is yours. Now go bananas!In addition to the message box text, please also set the title, buttons and the result variable according to the example shown in the image above.
Click on OK to save this step.
-
Hit start, loop through the screens until you have bought 5
 , trade
them for a
, trade
them for a  and victory is yours
  .
.